In this post I will describe how to setup and configure a single-node Hadoop
installation so that you can perform simple operations using Hadoop
MapReduce and the Hadoop Distributed File System (HDFS).
Prerequisites
SSH installation can be done by running the following command

Installing Software
Actual hadoop Installation start from here:
Step 1: Adding a dedicated Hadoop user
Login as a Root user to perform this steps
Running the following command
$ sudo addgroup hadoop
This command creates a new group by name hadoop.

$ sudo adduser --ingroup hadoop hadoopuser
This command creates a new user in that group.


Step 2: Configuring SSH
Hadoop requires access to localhost (in case single node cluster) or communicates with remote nodes (in case multi-node cluster). After this step, you will need to generate SSH key for hduser (and the users you need to administer Hadoop if any) by running the following commands.
Before running this commands you should switch to hadoopuser
$ su hadoopuser
just start pressing enter.
.png)
Just to verify that all process went correctly run the below command


Errors that you may get in this step are

Please note if you want to grant access for another hadoop admin user then
NOTE:
export HADOOP_HOME=/home/hadoopuser/hadoop

Hadoop Configuration:

make sure you give correct Java home path.
core-site.xml

mapred-site.xml
$sudo gedit home/hadoopuser/hadoop/conf/mapred-site.xml
Add following code in between configuration tags

hdfs-site.xml
$ sudo gedit home/hadoopuser/hadoop/conf/hdfs-site.xml
Add the following code in between configuration tags.
<!-- In: conf/hdfs-site.xml -->

Thus we have made all the required changes that needed to set a single node cluster.
Formating Namenode:
In order to format namenode go into bin directory by following command
$ cd home/hadoopuser/hadoop/bin
$ ./hadoop namenode -format
which will format the namenode and gives the result as follows:

Now start all the services by running following command
$ cd home/hadoopuser/hadoop/bin
$ ./start-all.sh

This command starts all the services like Namenode,Secondary namenode,datanode,jobtracker,tasktracker on single machine.
To see whether all the process has started run the command
$ jps

This shows that we have successfully configured a single node cluster.
Next????
In my Next post we will run a simple map reduce job using
1. Command prompt.
2. Setting and running in eclipse.
Prerequisites
- Java 1.6.x, must be installed. (Don't worry my previous post will help you doing this)
- ssh must be installed. (I will show you in this post)
SSH installation can be done by running the following command
$ sudo apt-get install openssh-server

Installing Software
Actual hadoop Installation start from here:
Step 1: Adding a dedicated Hadoop user
Login as a Root user to perform this steps
Running the following command
$ sudo addgroup hadoop
This command creates a new group by name hadoop.

$ sudo adduser --ingroup hadoop hadoopuser
This command creates a new user in that group.


Step 2: Configuring SSH
Hadoop requires access to localhost (in case single node cluster) or communicates with remote nodes (in case multi-node cluster). After this step, you will need to generate SSH key for hduser (and the users you need to administer Hadoop if any) by running the following commands.
Before running this commands you should switch to hadoopuser
$ su hadoopuser
$ ssh-keygen -t rsa -P ""
just start pressing enter.
.png)
Just to verify that all process went correctly run the below command
$ ssh localhost


Step 3: Disable IPv6
You will need to disable IP version 6 because Ubuntu is using 0.0.0.0 IP for different Hadoop configurations.
You will need to run the following commands using a root account:
$ su root
$ sudo gedit /etc/sysctl.conf

Add following commands at the end of the file.

To confirm whether the Ipv6 is disabled you can run the following commands
$ sudo sysctl -p

$ cat /proc/sys/net/ipv6/conf/all/disable_ipv6

After running the above command which will give output as 1.
Which confirms that IPV6 is disabled.
Step 4: Setting up Hadoop
1. Login as hadoopuser and Download Hadoop from any of mirrors here.
You will need to disable IP version 6 because Ubuntu is using 0.0.0.0 IP for different Hadoop configurations.
You will need to run the following commands using a root account:
$ su root
$ sudo gedit /etc/sysctl.conf

#disable ipv6
net.ipv6.conf.all.disable_ipv6 = 1
net.ipv6.conf.default.disable_ipv6 = 1
net.ipv6.conf.lo.disable_ipv6 = 1

To confirm whether the Ipv6 is disabled you can run the following commands
$ sudo sysctl -p

$ cat /proc/sys/net/ipv6/conf/all/disable_ipv6

After running the above command which will give output as 1.
Which confirms that IPV6 is disabled.
Step 4: Setting up Hadoop
1. Login as hadoopuser and Download Hadoop from any of mirrors here.
NOTE:
I personally recommend to download a stable version.Here I have downloaded a
stable version hadoop-1.1.2.tar.gz from here.
2. The downloaded hadoop-1.1.2.tar.gz will be available in /Downloads
Run the following commands to unzip the tar file.
$ cd Downloads
$ sudo tar xzf hadoop-1.1.2.tar.gz
The unzipped folder by name hadoop-1.1.2 will be available in Downloads. Just move this folder to a new folder hadoop.
$ sudo mv hadoop-1.1.2/ /home/hadoopuser/hadoop
Then you can check in home/hadoop will have all the internal files.This are the files that will be edited in the next steps.

Errors that you may get in this step are
1.Permission denied error saying that user not in suders file which will be reported

Please note if you want to grant access for another hadoop admin user then
Run the following commands
$ sudo chown -R hadoopuser2:hadoop hadoop
solutions:
1.Performing all this steps as a root user.
NOTE:
2.Adding hadoopuser to suder's file.
(Which is not recommended in realtime but solves most of your up coming Error)
By running Command(login as root)
$ sudo aduser hadoopuser sudo
By running above commands your giving all the permissions to hadoopuser which is not recommended in realtime.
Update $HOME/.bashrc
you need to manually edit the .bashrc of hadoopuser with the following code.
Run this commands as root user
$ sudo gedit /home/hadoopuser/.bashrc
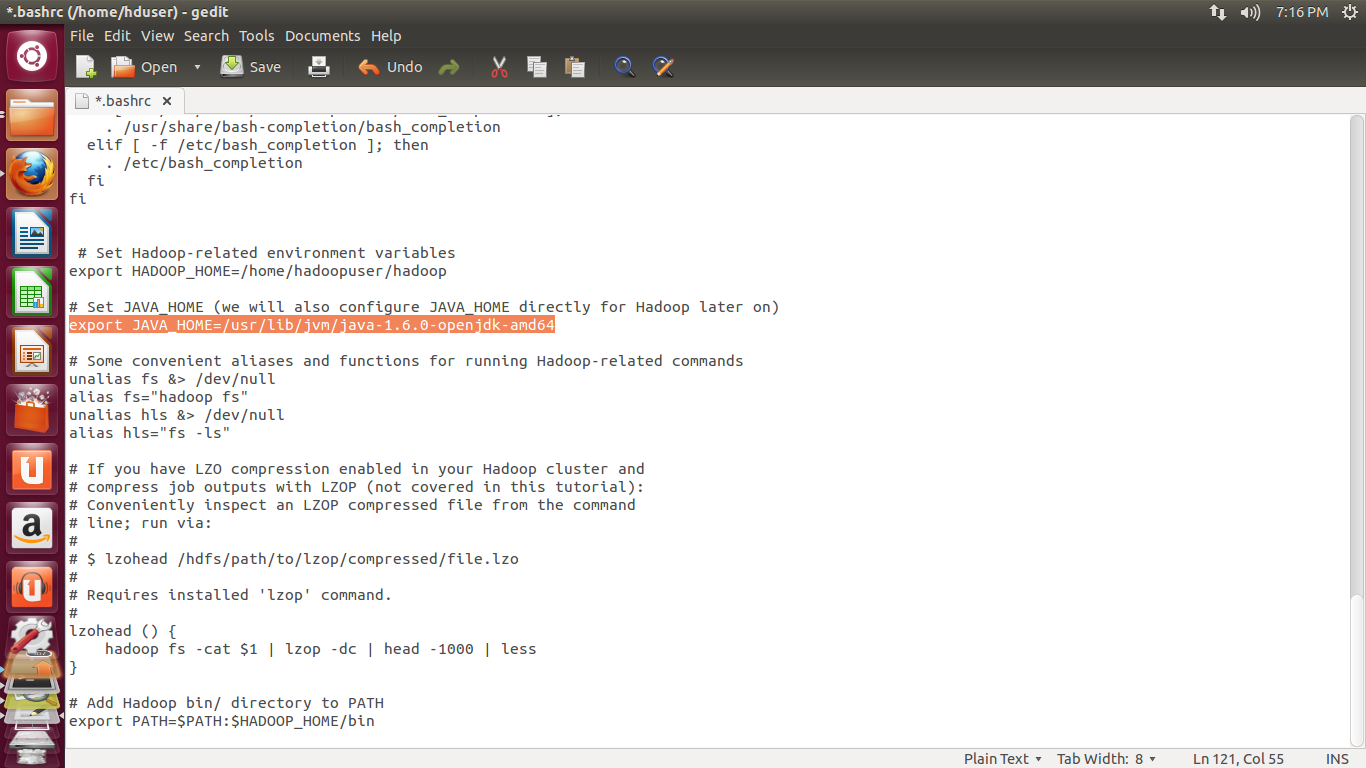
Add the following code at the end of File.
# Set Hadoop-related environment variables
export HADOOP_HOME=/home/hadoopuser/hadoop
# Set JAVA_HOME (we will also configure JAVA_HOME directly for Hadoop later on)
export JAVA_HOME=/usr/lib/jvm/java-1.6.0-openjdk-amd64
# Some convenient aliases and functions for running Hadoop-related commands
unalias fs &> /dev/null
alias fs="hadoop fs"
unalias hls &> /dev/null
alias hls="fs -ls"
# If you have LZO compression enabled in your Hadoop cluster and
# compress job outputs with LZOP (not covered in this tutorial):
# Conveniently inspect an LZOP compressed file from the command
# line; run via:
#
# $ lzohead /hdfs/path/to/lzop/compressed/file.lzo
#
# Requires installed 'lzop' command.
#
lzohead () {
hadoop fs -cat $1 | lzop -dc | head -1000 | less
}
# Add Hadoop bin/ directory to PATH
export PATH=$PATH:$HADOOP_HOME/bin
The most Important part in the above text is to give correct
JAVA_HOME path
You can find java path going into /usr/lib/jvm
$ cd /usr/lib/jvm
If you followed my process of java installation running above
command will look like below screen shot.

Give the directory name such that it contains bin/java folders inside it.
According to my installation the JAVA_HOME path will look like below
JAVA_HOME /usr/lib/jvm/java-1.6.0-openjdk-amd64

JAVA_HOME path
You can find java path going into /usr/lib/jvm
$ cd /usr/lib/jvm
If you followed my process of java installation running above
command will look like below screen shot.
Give the directory name such that it contains bin/java folders inside it.
According to my installation the JAVA_HOME path will look like below
JAVA_HOME /usr/lib/jvm/java-1.6.0-openjdk-amd64
Hadoop Configuration:
To configure hadoop in your machine the following three files must be edited that is available in hadoop/conf.
- hadoop-env.sh
- core-site.xml
- mapred-site.xml
- hdfs-site.xml
hadoop-env.sh:
Just you need to edit the JAVA_HOME path by removing "#" symbol.
make sure you give correct Java home path.
core-site.xml
First, we need to create a tmp directory for Hadoop framework which is used by hadoop to store some of its files. If you don't create hadoop will create on its own. This directory is very important while creating a multi node cluster. Create tmp directory in home/hadoopuser.
$ mkdir home/hadoopuser/tmp
$ sudo chown hadoopuser:hadoop /home/hadoopuser/tmp
$ sudo chmod 755 /home/hadoopuser/tmp
We are setting to give permission so that other hadoopuser can access this directory. (Very Important in multinode cluster)
$ sudo chown hadoopuser2:hadoop /home/hadoopuser/tmp
Now edit core-site.xml my running the following comands
$ sudo gedit /home/hadoopuser/hadoop/conf/coresite.xml
Copy the below lines of code between <configuration>.....</configuration>
<!-- In: conf/core-site.xml -->
<property>
<name>hadoop.tmp.dir</name>
<value>/home/hduser/tmp</value>
<description>A base for other temporary directories.</description>
</property>
<property>
<name>fs.default.name</name>
<value>hdfs://localhost:51001</value>
<description>The name of the default file system. A URI whose
scheme and authority determine the FileSystem implementation. The
uri's scheme determines the config property (fs.SCHEME.impl) naming
the FileSystem implementation class. The uri's authority is used to
determine the host, port, etc. for a filesystem.</description>
</property>
mapred-site.xml
$sudo gedit home/hadoopuser/hadoop/conf/mapred-site.xml
Add following code in between configuration tags
<!-- In: conf/mapred-site.xml -->
<property>
<name>mapred.job.tracker</name>
<value>localhost:51002</value>
<description>The host and port that the MapReduce job tracker runs
at. If "local", then jobs are run in-process as a single map
and reduce task.
</description>
</property>
hdfs-site.xml
$ sudo gedit home/hadoopuser/hadoop/conf/hdfs-site.xml
Add the following code in between configuration tags.
<!-- In: conf/hdfs-site.xml -->
<property>
<name>dfs.replication</name>
<value>1</value>
<description>Default block replication.
The actual number of replications can be specified when the file is created.
The default is used if replication is not specified in create time.
</description>
</property>
Thus we have made all the required changes that needed to set a single node cluster.
Formating Namenode:
In order to format namenode go into bin directory by following command
$ cd home/hadoopuser/hadoop/bin
$ ./hadoop namenode -format
which will format the namenode and gives the result as follows:
Now start all the services by running following command
$ cd home/hadoopuser/hadoop/bin
$ ./start-all.sh
This command starts all the services like Namenode,Secondary namenode,datanode,jobtracker,tasktracker on single machine.
To see whether all the process has started run the command
$ jps
This shows that we have successfully configured a single node cluster.
Next????
In my Next post we will run a simple map reduce job using
1. Command prompt.
2. Setting and running in eclipse.
No comments:
Post a Comment